I think a lot about spinning, and spinning wheels.
And lately I’ve been rather consumed by the thought of figuring out what would be my ideal wheel.
There are so many styles and types: modern/traditional, castle/saxony/norwegian/tyrolean, etc, etc, etc.
And it’s not just an issue of style, but also how the form fits the function.
I currently have three wheels: a Kromski Minstrel (Stella), a Pirtle bulky spinner (Hank), and an antique probably Serbian little skewed wheel (Sophie).
Of these three, I’m kind of favoring Sophie these days.
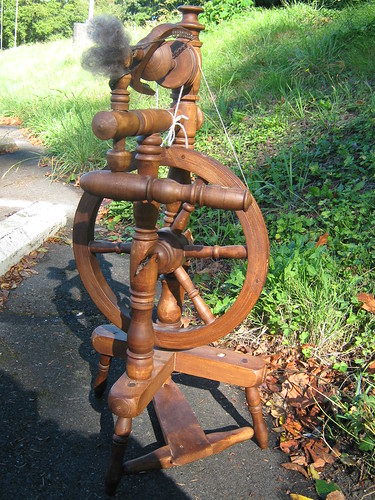
She’s got this great 45 degree angle thing going on between the treadle and the flyer, and with the way I spin, it is pretty much perfect, ergonomically speaking. But she’s just little. About a 15″ wheel. She’s a great traveller, but my perfect home-based wheel would have a larger wheel and would operate at higher ratios.
I’m thinking 24 inches would be about right.
The Stella, my Minstrel has served me well for over 5 years,

and turned out miles and miles of yarn. Lots of things I like about this wheel- double drive/scotch tension, large bobbins, very smooth and quiet, larger wheel than Sophie (18 inches). But lately I find that when I spin on her I’m more comfortable sitting a ways back and off to the side, just using one foot to treadle. It works, but is not ideal.
(Hank, the Pirtle is cool,

but he’s a specialized guy, so he doesn’t really figure in this discussion.)
It was suggested to me by someone who knows a lot about spinning and wheel mechanics that I might want to get a wheel that has the flyer assembly on the right side, because I draft with my right hand forward.
That makes sense, but in a regular Saxony or Norwegian configuration, that would mean having the treadle off to the left. I’ve tried at home to see if I could get used to treadling with just my left foot, and it feels really weird.
But then I saw the answer.
The Swiss Production Wheel.
http://habetrot.typepad.com/habetrot/2006/10/post.html
http://www.ravelry.com/projects/nimrodvern/lafayette-wheel
http://threesheeps.blogspot.com/2010/09/new-weaving-and-old-spinnign.html
http://www.flickr.com/photos/22356120@N05/sets/72157624881847621/
On these guys, you sit in line with the wheel, flyer pointing off to your left.
Neat, eh?
And since the treadle doesn’t have to go under the wheel,, you don’t need to set the whole thing up on legs, and it is quite compact while still having a larger wheel.
But you don’t see a whole lot of these wheels around. Most are antiques.
My plan- to build one (with the help of The Man, of course)
More on that next week 🙂
