I’m still ribbing, but have written up my recipe for the vest, so thought I would share it here:
Stranded Shawl-collared Vest
Needles: size 3 (or whatever works for you) circulars, in 36” and 16” lengths
Gauge approx. 6 st/in, 6 rows/in
Approx. hip/chest measurement 42”
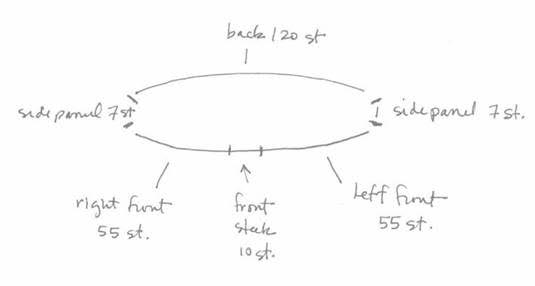
Cast on 254 stitches and place markers for front steek (10 stitches) and side panels (7 stitches each)
Note: Front steek stitches replace 10 colorwork pattern stitches in center front.
Work even in charted pattern for 2.5-3 inches (depending on desired length) then begin waist shaping.
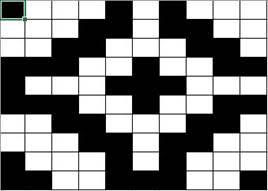
colorwork motif:
Decrease each side of side panels every 4th round, 4 times. (-4 stitches each decrease round, total -16 stitches)
Knit even in established pattern for 1.5-2 inches, then continue waist shaping.
Increase (in pattern) each side of side panels every 6th round, 4 times (+4 stitches each increase round, total +16 stitches)
Continue knitting even in pattern to desired underarm length.
Once you reach the underarms, knit a round in pattern binding off the side panel stitches as you go.
In the next round, cast on 7 steek stitches in place of the underarm stitches that were bound off the previous round.
Next round, begin shaping armholes and v-neck
At the same time, decrease one stitch on each side of the armhole steek stitches every round for 5 rounds, and
Decrease one stitch on each side of the front center steek every 3rd round 7 times, then every 4th round 5 times.
Knit even in pattern until about 1.25 inches short of desired armhole depth. At this point, put front stitches (and half of steek stitches on each side panel) on a holder (or another circular needle) and work short rows back and forth across back stopping short of each edge by 4, then 8, then 12 stitches to create a slight slope to the shoulders. Put back stitches on yarn to hold.
Now put front stitches on 16” circular needle and join to work in the round. Continue to work even in pattern for about 2.5 inches, then work shoulder shaping short rows back and forth across front, stopping short of each edge by 4, then 8, then 12 stitches to create a slight slope to the shoulders. Put front stitches on yarn to hold.
Reinforce (crochet, machine sewing, whatever you’re comfortable with) and then cut the front and armhole steeks. Fold under raw edges and sew down by hand (I used my background color yarn).
Use three-needle bind off to join shoulders.
With yarn held double, pick up stitches along edge of armholes (betwee body stitches and steek stitches) and purl two rows, then cast off.
With yarn held double, pick up stitches along fronts and neck (between body stitches and steek stitches )to work shawl collar and button band.
Collar/button band setup row: k4, k2tog across wrong side, resulting in purl bumps that sit right up against the edge of the body of the vest and form a nice clean little edge. Turn, and work in K1P1 rib to center of back neck.
Shawl collar directions: Continuing in K1P1 rib work to end of back neck stitches, wrap next stitch and turn. Continue in this manner working two stitches more at the end of each row until you have eight wraps on each side of the collar.
Then begin working three more stitches at the end of each row before wrapping and turning. Continue in this manner until you reach the beginning of the V-neck shaping.
End of short row collar shaping.
Continue in 1X1 rib knitting full rows from end to end to achieve desired depth of button band.
Cast off with regular firm bind off from bottom to start of collar shaping, then with Jeni’s surprisingly stretchy bind off for the collar, and back to the firm bind off for the rest of the other side button band.
Place 4 or 5 markers on each side for buttons and button loops.
Take about 12-15’ lengths of yarn and twist tightly and let double back on itself to create a tight 2-ply cord. Use these lengths to create button loops, affixing them to button band by inserting them with a darning needle perpendicularly through the edge and back towards the selvage, securing them near the selvage edge by weaving in to neighboring stitches.
Sew buttons on opposite side, near base of button band, and reinforce with smaller flat buttons on reverse.
Sew down steek selvages flat on inside of garment, tucking loose ends underneath.
Weave in any loose ends.
Voila!